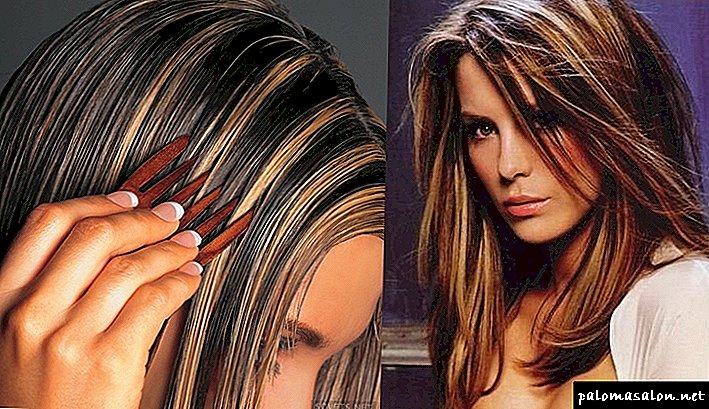
In Russia in the old days braids of hair on the head were considered a symbol of vital energy, they were braided strictly along the spine. Spit played an important role in the lives of girls, girls, women, they were distinguished by whether a girl was married or not.
Nowadays, traditions have changed, and the braids have lost their vital meaning, but they have not lost their beauty. Not all modern women are able to weave braids with ribbons and other objects. How to do it correctly, you can learn from this article.
Simple three-row ribbon braid
Weave a braid on medium or long hair. According to the type of hair it is better to use it for normal and dry hair. AND absolutely not important, straight or curly hair. When braided on straight hair, the braid will be even with clear lines, when braided on curly hair, it will turn out to be voluminous.
The braid is woven in several stages, the name of the strands does not change until the end of the weaving, i.e., if the strand was originally in the middle, then in the instructions below it will be called the middle one.
- Pre-comb hair, splash lacquer weak hold,
- Divide into three strands and pick up the hairband for the dress,
- Fix the tape with a rubber band, pin or tie to the middle strand,
- The left strand must be thrown over the middle one and, passing under the ribbon, fixed under the right,
- Throw the middle strand over the right and fasten over the left strand, threading the tape over the top,
- Next, repeat alternately the steps from paragraph 4, 5 until the end of the weaving of the braid.
Performing such actions, you can give airiness hairstyles, if the strands weave a little letting go, and not pulling strongly.
Spit of four strands with ribbon
A four-strand braid with a ribbon is a good option for both evening wear and sports. As well as a three-strand braid, you can make it for any type and structure of medium or long hair.
- Carefully comb the curls and sprinkle with hairspray or mousse, you can water from the spray,
- Hair and divided into 4 strands, where the third strand will be central, attach selected tape to it,
- 1 strand skip under 2, and throw on 3 and skip under 4 strand of hair,
- 4 strand skip under 3 and throw over 2 strands of hair,
- 2 strand over 3, skip under 1, then skip 1 strand under 3 strand (central, which is with tape),
- Then repeat all the steps alternately to the ends of the hair.
 How to braid a 4-strand braid with two ribbons is shown in the photo instructions.
Bottom braid tie with ribbon in a bow or secure with an invisible elastic band.
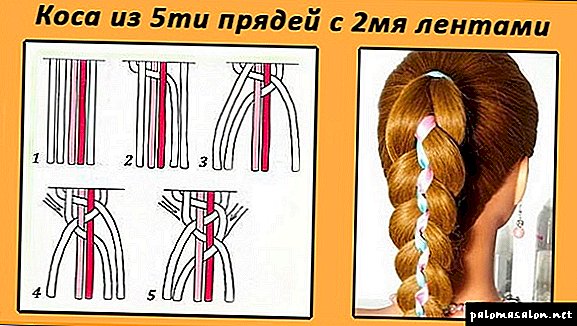
Five strand braid with two ribbons
A braid of five strands with two ribbons will look most impressive on long hair. It is easier to weave such a braid on even hair.
How to braid a braid with two or more ribbons is described in this step-by-step instruction:
- Comb the hair with a fine comb and sprinkle with a lacquer medium fixation, so the hair will be easier to weave, they will be obedient,
- Divide hair into 5 equal strands, attach multicolored or monochromatic ribbons to the first and fifth
- Weaving begins on the left side, skip the first strand over the second and lower under the third,
- Put the fifth strand (with a ribbon) on the fourth, skip under the first (with the ribbon) and put on the second strand of hair,
- The second to put on the fourth strand,
- Further, all actions are carried out similarly to the previous one.

Tapes can use any texture and width, in this case, it will be easier to weave.
Kanzashi on tape
An incredible beautiful hairstyle will look like a braid with a kanzashi ribbon, elegant and festive. This hairstyle is done on dry and clean medium and long hair of any type.
To create it, you will need a foam roller and kanzashi tape:
- Comb your hair so that there are no “cocks” and collect it in a ponytail, which is secured with an invisible elastic to match the color of the hair,
- Separate 4 part of the tail, put a roller on the rest of the strand,
- From the top of the roller, take 2 small strands, from the bottom, from under the roller, take one thin strand. Knit 1 row as a simple three-row braid. Attach a tape with kanzashi to this row,
- Again, from the top strand of the roller, take a small strand of hair, add to the braid and knit 1 row, where the ribbon with kanzashi will always be on the central strand,
- Next, from under the roller, take a small strand, add to the braid and knit a row,
- Such actions are repeated alternately "top - bottom"
- When the ribbon is completely interwoven, and all loose strands are used, connect the end and beginning of the ribbon with kanzashi with an invisible and pin them to the base of the tail.
Thus, you get a kind of high hair with very elegant kanzashi.
Braid with a bright ribbon diagonally
How to make a braid with a ribbon of a bright shade, this scheme will tell. This hairstyle is suitable for a child in the garden or school, as well as for representatives of office professions.
Make a hairstyle better on medium or long hair, but it is also possible for girls with a hairstyle.
- It is important to carefully comb your hair before creating any hairstyle and sprinkle it with a fixative,
- Separate three small strands on the right or left side of the forehead,
- Next, a braid is woven, similarly to three-strand braids with a ribbon (or a simple braid, on the contrary), only with a grab and a diagonal.
Bottom, if there is a ribbon, you can make a bow with which to fasten the tips of the pigtails. If the tape is not enough until the end of weaving, then you can carefully tie or sew a piece of another tape to it.
Chess spit with two wide ribbons
The weaving of a chess spit may seem complicated at first, but it is worth doing 2-3 rows of weaving, and it turns out that this version of the spit is very simple. The option is suitable for owners of straight hair with short hair, on the type of "square", or for girls with medium and long hair, of any type.
How to create a chess spit with two wide tapes is described in this manual:
- It is necessary to sit down so that there are 2 mirrors behind and in front, thanks to which it will be possible to control the actions and make a neat braid.
- From the top, separate a small part of the hair - a strand, throw it over to the side of the face, fix 2 wide ribbons under it with invisibility, so that the design or the lace would be under the upper "face" strand,
- After the tape is secured, the hair should be lowered to the back of the head. The upper strand is divided into three equal parts,
- In the left hand take 2 strands of hair, in the right - 2 tapes and 1 strand of hair. Ribbons should be in the middle between the 2nd right and the 1st left strand,
- On the right side, hold the outermost (first) strand over the second, and the first tape over the outermost (first) strand. The second tape falls under this strand, above which the 1st tape. The first strand of hair will be under the strand on the right side (the third strand of hair),
- Lower the third strand under the first tape and pass under the second tape,
- On the left side, add a small lock of loose hair to the left,
- Divide the hair on the left into 2 parts, skip the resulting extreme strand under the first flight and put it on the second tape and lower it under the strand on the right,
- Further actions are repeated in the same way. With each row, you must add left and right along the strands of the remaining hair.
Openwork braid from one strand with a ribbon
Openwork braid from one strand with a bright ribbon is the easiest option to make a haircut to yourself, even without a mirror. This option is suitable for girls with long and medium, curly and even hair.
How to weave a braid with a ribbon will be considered further step by step:
- Separate a small strand from the top of the forehead to the middle of the head (on the top of the head), tie a ribbon under it,
- Strand the top straps with ribbon so that it is over the strand,
- The strand is wrapped around the top right with the index finger, below with the thumb, but so that it is on the left, as if pulling out a small loop from the hair, to the right,
- Hold the loop firmly, on the right side of the face, add a small lock to this strand under the loop (make a tack),
- Tape the top to wrap the first loop of the braid,
- Again from the strand make a loop on the left side, and under it add a small strand of loose hair and tie it with a ribbon by analogy,
- All actions are repeated from right to left by analogy,


Creating such a scythe, you can use the "crab" or invisible to fix the tape on each row.
Openwork braid with two ribbons
Openwork braid with two strands of hair and two contrast ribbons suitable for girls with long hair. It turns out neat and very elegant.
- To collect hair on the crown in the tail and secure with a rubber band to match the color of the hair,
- Hair divided into 2 equal parts,
- Tie 2 ribbons to the tail (yellow and green) so that they are under the tail,
- The yellow ribbon should be between 2 strands of hair, green to the right of the strands,
- Hold a yellow ribbon under the first strand and put it on the second strand of hair,
- Put the green ribbon over the last strand above and below the second one,
- Place the yellow ribbon under the outer strand on the left, lower the green ribbon under the yellow one,
- Next, lower the yellow ribbon under the strand on the right and the green one above the strand on the left,
The remaining rows are lagging along the same principle, interlacing alternately. When weaving such a scythe, it is not necessary to severely row, they must be free.
French braid reverse with ribbon
The French braid, on the contrary, is the weaving of the spike, on the contrary, the strands are shifted not from above, but from below. The braid is suitable for any age, straight and curly, medium and long hair, to any style: office, sports, evening.
- At the crown, separate the hair strand and divide into three equal parts, tie a ribbon to the central part,
- It is necessary to perform weaving operations, as for a simple braid of three strands with a ribbon, but skipping strands on each row from the bottom,
- And also to capture on each row additional, thin strands, now to the right, then to the left.


Tape for the French braid, you can take a thin, thick, or add a tape with kanzashi.
Spit chain with ribbon
How to braid a braid with a ribbon in the form of a chain will tell this manual. For weaving you need docile, even hair lengths below the shoulders and more.
- At the crown, tie the tail, which is divided into 5 equal strands,
- On the middle strand bind the tape,
- At first, the first row is woven like a 4-strand braid, and the fifth strand with a ribbon remains on top of them. The first strand over the second, and under the fourth over the fifth. In the opposite direction, the fifth above the first and under the fourth,
- On the right you get 1 and 4 strand, on the left 2 and 5 strand,
- The fourth to skip over the ribbon, and the second to skip over the fourth and above the ribbon,
- Skip the first one under the ribbon and skip the fifth under the first one and under the ribbon (it’s a chain)
- Further actions are repeated until the tips of the hair, which are fixed at the end of the rubber band.


A braid is a chain, you can make 4 strands of hair and 1 strand of thick tape, then it will turn out less voluminous.
Spit Lino Russo with ribbon
Spit Lino Russo is suitable for owners of long, even hair, both for everyday wear and for holidays, if you decorate it with an unusual ribbon.
- Separate 1 thick strand on the top of the head, secure with a rubber band to match the color of the hair and spray with a fixative,
- Tie a ribbon over the tail, so that its ends are interwoven under it,
- The strand is divided into 2 parts and to each part, on the right and left to add a thin strand of loose hair. The tape should be above the added strands,
- Twist the right ribbon around the right, left-left strand around the left, crossing the ends in the center under the ribbon,
- Again add on a new thin strand and twist. Further, all actions continue in a similar order.


It is important to fix the resulting braid at the base of the neck, then it will look smoother.
Spit wave with ribbon
Hair in the form of braids, waves with a ribbon will cheer up every girl, because she will look like a Hollywood star to her. To create a hairstyle fit any type of hair and length, starting from the square.
- Separate the hair strand from the temple to the temple from the side of the face and comb it to the side. Tie the rest of your hair into a pigtail or tail
- To fix a thin, satin ribbon from the side of the turn of the strand,
- From the large strand to separate the thin strand, starting from the face and wrap it with tape,
- Separate the next strand from the face, and wrap it with the same ribbon and thus all the strands to the middle of the face,
- Next, take the thin strands of the second row and weave them diagonally to the face,
- Then they pull out in one direction thin tied strands, creating waves,
- The remaining 5-6 rows, interlaced with ribbon, are made by analogy.


Such weaving can be done not only in one side of the wave, but also gradually turning in opposite directions
Christmas tree with ribbon
Weaving fir-tree with ribbon is suitable for long hair of any type.
The technique of weaving this braid is reminiscent of a “fish tail”, but another ribbon weaving is added to it. Difficult option for independent weaving.
- To tie the hair on the crown in the tail and tie a ribbon to it,
- Divide it into 2 equal parts, the tape should hang freely in the center,
- Each time it is necessary to take small strands from the bottom of the tail and toss it upward,
- Separating small strands on the right or left when weaving, they should be tied with a ribbon (around the strand) in the direction of the strand movement, then a Christmas tree pattern will be formed on the braid.


All actions must be carried out carefully so as not to knock the picture.
Spit waterfall with ribbon
A thin neat braid-waterfall can be made for long and short hair to the shoulders. This hairstyle makes it possible to wear loose hair, but fixed with a pigtail with a tape from the wind or hair tangling.
- Carefully comb the hair before braiding, to make it easier to separate thin strands from the top of the face,
- Weaving begins with the right or left side, to choose from,
- Separate 1 strand, under it put the short end of the tape,
- Take the second strand and put on the tape and the first strand, you get the cross hair strands. On which you need to pull the long end of the tape,
- Separate the strand from the face, and put under the strand above the ribbon and under the second strand,
- Further locks fall under a tape and cross (changing their places),
- Then again a new strand is separated from the face, and the actions of points 5 and 6 are repeated until the end of the weaving around the head to the opposite temple.


Scythe waterfall can be done around the head or, if the length of hair allows, curving from side to side in the form of a wave.
Fishtail with satin ribbon
The fish tail is woven by analogy with a scythe - a Christmas tree with a ribbon, only inside out and is suitable for girls with long hair.
This hairstyle can be done and a little girl and an adult woman, at a formal event or for everyday wear. Hair can be worn up to 4-7 days depending on the type of hair and their condition.
Pigtail tail with ribbon
How to braid a braid with a ribbon and a tail on long or medium hair, read in this instruction:
- Tie the tail on the crown, take a ribbon or a bow 2-2.5 times the length of the hair and tie around the elastic on the tail,
- 1 and 2 binding is done as when weaving a French braid,
- Next, the tape is displayed between the left and middle strand, bending around the middle,
- The binding is done again, as in the French braid and on the other side, the central strand is wrapped with a second ribbon,
- Identical weaving is done to the end.
Bottom braid fasten with a rubber band to match the hair color or, if the ribbon is left, make a bow.
Kanekolon Boxing Spit
Boxing braids with Kanekalon - a fashion trend and a very convenient option, especially if a woman goes hiking or a business trip for 5-7 days. The main secret to preserving the shape of a hairstyle for a long time is the need to wear a headscarf or cap at night. You must choose a kanekalon of a suitable color and decide on the number of braids.
The easiest option - 1-2 braids:
- Divide hair into 2 strands,
- To the first thin strand to tie a kanekalon thin strand,
- All actions are performed as when weaving a French braid with the gradual addition of strands of kanekalon.
With it, you can lengthen the hair or make a multi-colored hair.
Afrokos with kanekolon
Afrokosy with kanekalonom look good on long hair. With good care for such braids, you can wear them up to 2 months.
- The hair is divided into 4 equal parts on the head, so that they form squares,
- 3 squares to fix, and 1 to divide into small strands, to which to attach along the strands of Kanekalon,
- Weaving is carried out according to the principle of the French braid.
 Splicing Afrokos with Kanekolon itself is very difficult. It is better to entrust this business to professionals.
It is necessary to carry out the weaving towards the back for all the strands, so that later they can be gently lowered onto the shoulders or chipped into the tail.
French canacalone tresses
You can braid a French braid with kanekalon on any type of hair, using a retainer in the form of a gel, mousse or hairspray.
The optimal hair length should be below the shoulders, if you add to it a kanekalon of greater length, then the braids will look sleeker and more magnificent.
Weaving is carried out according to the principle of the French braid with ribbons.
Spikelets with Kanekalon

Kanekolon spikelets are French braids with the addition of kanekalon, which can be made to oneself without using a mirror. You can braid on medium and long hair of any type.
- Comb the hair and select 1 thick strand from the face to the top of the head, which is divided into three equal strands,
- Tie each kanekalon one color or different. You can tie Kanekalon to only one strand - it all depends on the desire,
- The first row is woven like in a simple three-strand braid; on the second row, add strands of loose hair from the right-to-left gradually;
Danish Kanekalon Spit
The Danish braid is a simple three-strand braid that interlaces the strands not from above, but under the bottom of the braid. There are many variants of weaving, you can make a tail and a braid out of it or immediately divide all the hair on your head into three equal strands. Tie Kanekalon to them by extending medium hair or adding volume to the braid, and also add contrasting colors of Kanekalon strands.
A simple “spin-up” braid is the fastest, easiest and most beautiful option for everyday wear or for a morning run.
Pencil scythe
Braided braid with a pencil like some flower on the stem, others - the peacock's tail. This is an unusual and simple version of weaving for an original and elegant hairstyle for long hair, suitable for both a little girl and an adult woman.
- Fasten the tail on the crown with a rubber band,
- Insert a pencil under the gum in the middle, aligning it so that the right and left sides are approximately the same length of the pencil,
- To separate the upper part of the tail, highlighting a thick strand of hair, which is divided into 3 equal parts,
- The first binding to do, like a three-spit braid,
- Next, on the right, add a thin strand from the rest of the tail, putting a loop on the pencil from the same side, then perform similar actions on the left side,
- Again make the binding of three strands, like a simple braid,
- Further, all actions are repeated again, until the hair in the tail is over.


If the hair to be added is finished, and the braid is under-braided, then it is braided like an ordinary three-strand braid, securing the end with an elastic band. Then pull out a pencil and straighten loops from the hair. This produces a kind of flower.
Greek braid on loose hair
Fashionable and original hairstyle, giving your hair some airiness and elegance. You can braid it yourself on medium or long hair.
- Comb the hair and divide them into 12 strands, which twist curling or ironing curls,
- On one side of the temple, take three thin strands and weave 2-3 covers, like a simple braid,
- Next, add a thin strand to each binding to the middle of the neck,
- To perform the same actions from the opposite side to the middle of the head,
- Tie 2 braids with an openwork hairpin or rubber band to match the hair color.


Curls straighten and fix varnish medium fixation.
Spit on loose hair around the head
A simple option instead of a hoop or headband is to make a braid around the head, leaving some of the hair hanging freely.
The hairstyle is suitable for children and adults with hair slightly longer than their shoulders. Too short hair is not enough to completely wrap your head.
- Part on the right or left side if desired,
- Separate three thin strands closer to the face, make 2-3 covers, as for a simple braid,
- Then with each new binding add a thin strand, then from the middle of the head, then from the edge of hair growth (face, temple), leaving the hair loose, gradually turning the braid around the head.
The end of the braid is woven or pin attached to the beginning or decorated with an original barrette. It is better to curl the remaining loose hair so that beautiful, symmetrical curls appear.
Braid rim on loose hair
The rim of the braid on the loose hair is better to do for long or medium hair.
- Comb your hair and throw forward to the face,
- Separate a thick strand of hair from the back of the head, divided into 2 parts and from each weave a simple three-spit braid,
- To lower all the hair back, under them there will be 2 braids that need to be twisted around the head with a rim in opposite directions, securing the tips of the invisible.
The rest of the hair to comb and the entire hair sprinkle with lacquer to fix.
Imitation of shaved temple on loose hair
The fashionable tendency to shave whiskey, leaving hair behind, is becoming stronger and stronger in most people.
- Comb the hair on one side,
- Highlight tonic strands at the temple and sprinkle with a fixative,
- Selected strands are tightly twisted into bundles, so that the scalp is visible, and fixed invisible. These strands need 4-7 pcs.
After the procedure, it is necessary to return the hair to its original state and slightly comb or pin behind the “malvina” from thin strands. Instead of plaits fashionable braid small braids, which can be fixed with satin ribbons.
Spit braid with ribbons is easy. How to do this, you can see in various detailed video tutorials. Each version of this hairstyle is good in its own way. You can try following the instructions to braid each of the presented types of braids and every day for a whole month look irresistible and mysterious.
Spit of four strands
Women's fantasy knows no bounds. It is not surprising that today there are a huge number of variations of weaving braids with a ribbon. Having understood the technology once, you can change your image every day with unusual additions in the hairstyle. Let us consider in more detail how the weaving of the four-row braid is performed.

- First, you need to comb the hair well, so that the hair is not tangled. In the frontal part of the separate part of the hair, choose a small strand and tie a ribbon to it.
- The part of the hair, which is separated, divided into three equal. The strand to which the ribbon is attached, joins in the middle part of the hair. To make it easier to understand how weaving is performed further, we denote parts by numbers 1, 2 and 3, where 1 is the left strand, 3 is the right strand, and 2 is the average.
- Now we braid the traditional braid to the bottom. Do not forget at the same time "skip" between the strands of the tape.

To make the braid look voluminous, it is recommended that you add hair on both sides as you weave. As for ribbons, they can be taken of any color, thickness and from any material. Pick an accessory so that the hairstyle looks harmoniously with the outfit. Pigtails with ribbons woven into them will be a great addition to any image.
How to braid a French braid with a ribbon
The French braid is distinguished by a difficult weaving, and adding a silk stripe to it is what girls are afraid of. Such fears lead to the fact that some of the fair sex decide to cut their hair short, others only do professional hair styling hairstyles. Why spend money constantly when you can learn how to make a beautiful hairstyle yourself? Of course, you have to spend a little time and work hard, but the result is worth it.

The French braid with an interwoven ribbon is a bright and romantic image that suits all the fair sex, regardless of age.
Execution technology
- We prepare the head of hair: well, we wash our hair, do not forget to use the conditioner. It is necessary in order to better comb hair. Before you begin to hairstyle, dry your hair well.
- Separate at the top of the main strand of hair. We do it in the same way as when weaving an ordinary French braid.
 Now we are trying to attach the tape under the selected strand. This can be done with the help of invisible hairpins. By the way, the wide openwork ribbon is very well suited for the image - it gives the hair a special charm.
 - Next, divide the hair into 4 equal parts and start weaving. The technique is the same as for ordinary French braids. The only caveat is to remember to thread the ribbon through the curls.

- When you reach the bottom, it is not necessary to fix the remaining tail with a rubber band - you can do it with the help of the same ribbon, it will look unusual. Of course, if the curls are very thick, you will have to use a rubber band.
- Fix hair with hairspray, and you're done! If there are several hairs sticking out on the sides, it is not necessary to remove them. Remember that a little “battered” is cute and original.

 Now we are trying to attach the tape under the selected strand. This can be done with the help of invisible hairpins. By the way, the wide openwork ribbon is very well suited for the image - it gives the hair a special charm.

Now you know how to weave a ribbon into a braid. The technology is not simple, but learning to do it is worth it. In the future, it will be possible to weave 2 or 3 strips into a braid, which will add additional luxury. This hairstyle is ideal for any celebration. A beautiful braid with a color ribbon perfectly harmonizes with the female image, fills it with softness and personality.
Video instructions for weaving braids with ribbons
How to weave an original and unusual braid chess:
Instructions for weaving braids from 5 strands with 2 ribbons:
Easy option. Step-by-step instruction
It is better to start with something simple, to understand the meaning of technology, and to further create masterpieces of tape art. Single-strand braid principle:
- Carefully comb hair, slightly moisten them, use means for laying. If the hair is thin and unruly, apply a wax to make it heavier.
- Highlight one large area at the crown.
- Under it tie a fabric strip.
- Form the selected area in a loop looking to the left. For convenience, secure with a barrette.
- Put the ribbon element on the loop and tightly wrap it. Take your time, the curl should not crumble.
- Catch a loose curl and form a loop again.
- Throw a strip and wind.
Carry out these actions, continue to the end. For a more open-ended effect, loops should be tightened close to each other. The scheme is simple to perform, but it looks very nice and neat. It can be a worthy addition to the office and evening look.
French braid with ribbon
This masterpiece is woven on the basis of the French braid, but with a ribbon looks more feminine. To create this hairstyle, you must follow the instructions:
- Hair is well combed, parted in the middle. Next, you need to select a little hair from this parting and divide them into three equal parts.
- A ribbon is fastened to the middle curl, the tip of which is to be hidden.
- Start weaving ordinary braids. The left strand and ribbon are always placed under the bottom, the right - above. The principle is to envelop the tape of the right strand.
- After each curl, leave the lower strand loose, instead take a new one that connects with the ribbon.
- Weave to the other side of the head. The result will be something like a waterfall.
- When the weaving has reached the level of the ear, weave a simple braid. The tips at the end should poditsya a little.
Next, we offer to learn how to weave a spikelet. The scheme of weaving will be presented both with a tape, and without it.
Three-weave
The usual three-strand pigtail is very easy to weave. This beautiful strip will serve as an additional decorative element that will add fresh notes to the image.
In the zone of the head, separate three equal parts. Attach a ribbon to the right. Braid, alternately throwing the strand on the strand. Make sure that the strip is always on top and not twisted. This is an easy and fast way.
French ears have always been popular. Their technique allows you to fully collect the head of hair in a charming hairstyle. The point is to pick up the side curls at the base. Ribbon decoration in this case may be the main strand.
Such a performance in the form of a snake is interesting, since it is performed in a zigzag manner. And if you carry out your plans with the help of the technique of French ears, and add some decoration, then you can achieve a stunning result.
- Comb and apply a modeling agent over the entire length. This will help weave curls, and they will become more obedient.
- Separate the average width of the strip along the line of the forehead from the left-sided temporal zone. This should not be a thin strip, the width of which will allow to weave a spikelet.
- In this zone at the temple separate a small thread and divide into two equal ones. By extreme tie tape. Thus, you get three working tail.
- On the contrary, the working threads are placed under the bottom. Those. bring the right strand under the middle one. It becomes central. Next, the left - under the center. This is the initial stage of the formation of pigtails.
- Next, perform alternately all the actions, braiding to the working curls, free side.
- Without reaching the line of the opposite temple, it is necessary to turn the creation. Now the process will be carried out from right to left. Part of the untouched hair at the temple, will help to carefully perform the turn.
- Turn the spikelet, weaving temporal locks into it, but do not engage them on the left side.
- After completing a couple of turns, stop braiding the strands on the right and engage those that hang from above.
- Continue without reaching the opposite side of the head. You need to leave there some hairs to make a turn in the other direction.
- Stop making a trail on the right, and braid only the opposite curls.
- So you turned down. Now to the right - drag only the right loose strands.
- The third turn is carried out by analogy with the previous ones. The amount of twist depends on the length of the hair.
- Fasten the edge of the braid with a rubber band and make a charming tail with a bow around it.
In order to make the installation look more voluminous, it is necessary to periodically pull the loops during the performance. Do this carefully so that the whole structure does not fall apart. Extrusion should be symmetrical.
This arrangement is suitable for everyday life and for publication. Color ribbons, use the color of the dress, or additional accessories included in the image.


Hollywood Wave Weave With Ribbon
This charming hair style will make you feel like a real star. Weave on the principle of single-strand braid (discussed above).But more ringlets are created, due to which the styling takes on an amazing appearance.
- Attach the braid to the crown.
- Separate a wide strand on her left.
- Place a ribbon on the strand and form a window (eyelet).
- Pull it out through the window and tighten.
- Take the next strand on the left side, also make a loop, stretch and tighten.
- The number of hairs taken varies. The most cute and complemented looks five waves.
- It turns out a stepped pattern of tape. Next, you need to create the same pattern in a different direction. This involves tails of workers strand. Start from the closest to the tape. It is worth noting that these tails will be working until the end of the binding.
- Add grab to it from the total weight of the hair. Make an eyelet, stretch the braid and tighten. Formed a small link. It should be pulled out a little.
- Take the next tail, add pickup, create a window, stretch and tighten.
- Such actions are performed until the last tail.
- The next stage is the return of working tails to the right side, i.e. repeat the steps done at the beginning.
- There should be an interesting pattern: ribbon steps and arcs from the links of the eyelets, into which the ends of the decoration were stretched.
- The links in the course of weaving are stretched to the size you need. You can cover their heads so that no grabs are visible. Or leave a tighter weave.
- Perform the process in stages over the entire length of the hair.
- You can weave to the ends and fix them with a bow.

An unusual variation will be the weaving completed at the back of the head. Collect the tail and braid the classic four-strand braid, pulling the edge curls. Then twist the pigtail spirally, drawing a flower. Secure with studs.
A braid with an interwoven braid is an opportunity to emphasize your individuality. Create a unique image. Give vent to the imagination, because there is a place to roam. Ways to create hairstyles with braid and ribbon element weight. Each can be improved and customized.
There is a way to weave the braid already in the finished hairstyle. To do this, use the crochet hook. Secure the ribbon and gently pull through the loop, creating the desired pattern.
For young fashionistas
Little princesses, too, have the right to look amazing. Surely, every mother braided her daughter. And limited to triple or ordinary spikelet. Knowing the basic techniques of weaving braids with ribbons, you can decorate the head of a little fashionista and do not worry that the design will disintegrate when you first jump from the step.
In this case, it is important that the styling does not interfere, does not make them heavier, and the hairs do not climb into the eyes. The most convenient option is a bun. But the usual gulka looks ordinary. You can create a beautiful bunch.
Tie a high tail. Braid four-strand braid with ribbon. Wrap the base of her tail. Decorate with flowers.
By the way, stripes with kanzashi flowers will look very nice on children's heads.
The kanzashi flowers on the braid will look original even on the head of a tiny little girl. Braid with such an element zigzag pigtail, picking up all the curls. Multi-colored flowers, cutely scattered around the binding, will create a mischievous look.
Ribbon with a ribbon is a classic combination that has never lost its relevance. The execution scheme is simple, as it might seem at first glance. Having perseverance, desire and patience - the development of technology will succumb to every girl. The result - a non-trivial and elegant hairstyle.
How beautifully weave a ribbon into a regular braid. Step-by-step scheme of weaving
Hairband has many advantages:
- It is an affordable and inexpensive accessory, instead of ribbons you can use bright yarn for knitting, a thin scarf, a scarf, chains and beads
- matched to a tone or contrasting tape complements the image, makes it complete
- allows you to give the hair the missing volume, and a rare pigtail to turn into a chic braid
- suitable for weekdays and holidays, for informal, business and festive atmosphere
- at first requires skill, but, having mastered the method of weaving, laying takes no more than 5-10 minutes
The easiest way is to weave a braid with a ribbon of three strands. To do this, you must fasten the tape at the base of the tail so that the node is not visible. Divide the hair into two even strands and place the ribbon between them. Further the usual braid braids, using a tape instead of one of locks. If the ribbon is thin or colored yarn is used instead, you can simply add them to the strands.

A spit of four strands looks particularly impressive. To do this, fasten the tape at the base of the tail, as indicated above. Hair should be divided into three strands, put the ribbon between the strands, so that it is the 2nd strand, if you look at the picture.

In our example, the role of the tape is performed by a thin braid braided from a curl separated from the tail.


The strand on the right (strand 4 in the photo) is placed on the bottom under the third, but on top of the second, the role of which is performed by a ribbon or a pigtail.

Strand 1 is placed on top of the fourth, but under the bottom of the tape or pigtails.

Further, the strand on the right always fits below the bottom of the adjacent strand, but over the ribbon.
Left - up, but under the bottom of the tape.

At the end of the braid is fixed with a rubber band. To spin the hairstyle surround look, you need to slightly weaken the strands, as shown in the photo.

Four-spit braid looks elegant, feminine and unusual, despite the fact that after several workouts, it will not be difficult to weave it even without outside help.


We choose the variants of weaving braids with a ribbon: braid from 4 strands, openwork braid, French braid, on the contrary
Having mastered the technique of weaving braids with ribbons of four strands on their basis, you can create incredibly beautiful hairstyles. A simple but effective option - openwork braids. The principle of creating an openwork braid is simple. After the braid is completely braided, it is necessary to carefully stretch the strands, loosen their tension, and then spray the hair with varnish. Fixation is necessary if you have soft silky hair. Otherwise, the hairstyle will quickly disintegrate or ruffle.


Weaving with a ribbon can be made in the technique of the French braid. French braid woven from the parietal part. First you need to secure the ribbon. In the area of the forehead, a part of the hair is brushed forward, and under them with an invisible bead, matched to the hair color, a ribbon is attached. Hair is divided into four strands, the role of one of them performs the tape. The French braid is an inverted braid, so we are doing the same steps as indicated in the instructions above, but vice versa. Where in the photo the strand was laid under the bottom, it should be laid up and vice versa. In addition, small locks of hair, picked up from the sides, are gradually added to each extreme strand.

"Elegant hairstyle for solemn outings"

"Chic version in the Spanish spirit"

"Instead of a ribbon, you can use chains or beads"
If you braid a spikelet or a French braid from the top of your head in a circle, you get an original hairstyle, comfortable for every day and quite elegant, suitable for holidays and parties.


Weave braids with ribbon. Master class in video tutorial
Weaving braids with ribbons can not be called a simple matter. At first you will be confused and, possibly, nervous about the fact that the braid does not work like the one in the picture. But it is necessary to understand the principle, and you can independently create the most incredible hairstyles. Video tutorials of masters help a lot in the difficult task, where the sequence of actions is clearly demonstrated and simple and understandable comments are given.
Classic spikelet
This hairstyle is truly universal. Spikelet with a ribbon and without fond of many women. The advantages of such a braid are that girls with sparse and thin hair can braid it, it will look three-dimensional. In addition, the hairstyle will look very nice on short hair. We suggest to get acquainted with the usual spikelet, and then learn how to weave a ribbon into it.
- Comb all the hair back, on the crown, select a small strand, divide it into two.
- From each edge you need to take one thin strand, take them between the two large ones.
- Continue weaving, collecting hair that is located at the temporal part. Do not forget that you also have basic thick strands that must be supplemented as you create a braid.
- How to weave a “fishtail” when the extreme hair has run out and only two thick strands are left in the hands? It is necessary to select thin from each edge, which will be woven to the end of the length.
- At the end, secure your cone with an elastic band.
Spikelet with ribbon weave a little harder. We suggest to consider the instruction.
How to weave a fishtail with a ribbon?
Tie your hair at any height, fasten it with a long ribbon so that the knot will divide it in half. One end of the tape should be on the bottom and the other on the top. Divide the curls into two parts, the third will be exactly the tape. Weave so that each ribbon remains in its place.
As a result, you get a spikelet with a ribbon along the entire length. It will look like a fishtail, in the middle of which there is a ribbon of your chosen color. It will be visible from both sides.
Two pigtails are also quite popular. There are many variations. Someone weaves separate braids, and someone combines two into one. The main thing is to divide the hair into equal parts, weave each braid according to the usual spikelet pattern. With a tape or without a hairstyle will look amazing!
How to choose the right braid
Surely you have met women with beautiful, but not suitable for their style (or clothes) styling. That is why it is very important to know how to choose the right hairstyle.
Of all the abundance of possible options, the spit is rightfully the most universal. There are a huge number of techniques that allow you to perform a gorgeous hairstyle, regardless of hair length, age and clothing style.
When it comes to weaving on the child’s hair, the use of bright accessories and all kinds of rubber bands would be appropriate. It should be remembered that in childhood strands are thinner, and therefore it is better to choose volumetric rubber bands, large bows and unusual figured hairpins. Such hairstyles are weaved easily, without too tightening the strands - otherwise you could damage your hair.

Older girls can experiment with their own locks. When you are going to study or work, you can braid a classic spikelet, a French waterfall, a plait-braid or a fishtail. For more festive events, you can perform spectacular weaving braids with ribbons.
Varieties of weaving
Women managed to come up with a huge number of weaving schemes, each of which is in its own charming and beautiful. The most popular options are:
The easiest way to master the technique of weaving spikelet. First of all put means for laying (it can be a varnish, a skin or gel). After that, at the beginning of hair growth, a strand is taken and divided into three equal parts. It is better to do it slowly, choosing thin strands - this will make the hairstyle delicate and neat.
Weaving is carried out on the principle of crossing the right and left strands. With each new round it is necessary to pick up the lower part of the hair, gently weaving it into the ear.
About popular French braids
It is interesting to know that this type of weaving has absolutely nothing to do with France. For the first time, the inhabitants of southeastern Algeria have mastered the French braids. This is evidenced by wall paintings and other historical artifacts. Later, the fashion for this hairstyle rooted among the beauties of ancient Greece.

French braids look elegant and impressive, and therefore are in demand even among modern singers, actresses and TV presenters. Master this technique on the strength of any girl. If desired, you can diversify it by adding a braid with a ribbon - weaving will look simple, but at the same time elegant.

- Haircut with hot scissors solders the split ends and heals damaged hair.
- If you dream of beautiful and silky hair, go to the biolamination of hair, feel free to read the details here.
Easy version of pigtails with ribbon
You can add a special zest to your hair with the help of openwork and satin ribbons of all colors. At first glance, this may seem complicated or even impossible, but carefully following all the instructions, you will learn the lesson of weaving a braid with a ribbon the first time.
It is necessary to begin from above, dividing the curls into three equal strands. The tape chosen by you is fixed invisible in the middle, as close as possible to the growth zone. After that, the left strand is carried out over the middle and under the ribbon. Similarly, you must do with the right side (in this case, the tape will be at the bottom of the hair).

Further, the pattern of weaving a braid with a ribbon is repeated, but with each new curl, add strands from the bottom. When all the curls are neatly woven, hairstyle is tightened with a rubber band.
Simple weaving options for every day
Fishtail - beautiful and feminine hairstyle, which is quite simple to perform. To master the weaving of this braid with tape step by step, is quite simple:
- First of all, the hair is divided into two segments, and the tape is fixed on the left. After that, put the tape on the strand, then under the strand. Thus, the decoration as if wraps around the strand to lie down again.
- Having separated a new strand on the right side, it is necessary to hold it under the strand left earlier. This new round is wrapped with ribbon.
- Further it is necessary to continue without changes, with each new round adding grab.
Unusual four-strand braid
At first glance, weaving a 4-strand braid with a ribbon can seem rather complicated. To master this technique really have patience, but the result will certainly be a pleasant surprise.
The instruction of weaving a braid with a ribbon should be performed step by step so that you do not miss anything:
- The first thing you need to do side parting. After that, separate the thin curl on the left, on which the tape is fixed.
- Next, the curl is divided into three equal strands + tape. In order not to get confused, number the strands from left to right so that the tape is third.
- The first coil is formed when the first strand passes under the second and is on the third. After that, the fourth curl should be put on the first and skipped under the third.
- Further, the scheme must be repeated by adding additional curls to the main braid. Do not forget that the numbering will be slightly changed: the second, fourth, third and first.
- When all the hair on the left side are woven, you can proceed to the same weave on the right.
- To make the hair more elegant, you can put two pigtails and fix hairpins. The resulting hairstyle will resemble a flower.
- It is better to sprinkle hair with varnish so that the hairstyle retains its attractiveness as long as possible. Do not forget that the lacquer should be no closer than thirty centimeters from the hair - otherwise the curls will stick together and will look dirty.
Spit waterfall
If you decide to learn weaving braids with a ribbon, step-by-step instructions of the hairstyle called “waterfall” will be most welcome. Despite the simplicity of technology, not many girls can master it the first time. This hairstyle looks really gentle and perfectly complements the image.
It is necessary to begin with creating a smooth parting on the crown. Next, you need to take a square section at the parting, and divide it into three equal strands. The tape is fixed on the middle curl.

According to the first, weaving is carried out according to the principle of the classic braid: the strand lies on the left side, and the ribbon is on the bottom, and on the right side - on the top. In order for an ordinary braid to turn into a waterfall, it is necessary to leave an extreme strand with each curl and replace it with a new one.
Having reached the level of the ear on the other side of the head, it is better to finish the hairstyle with classical weaving, without adding new curls.
Especially good this hairstyle looks in summer and spring, when girls wear luxurious dresses made of lightweight fabrics.
Square braid
If you are going to a solemn event and want to impress those present with your stunning appearance, try a square braid on your hair.
At the crown, it is necessary to separate the hair strand, and then divide it into three equal segments. After that, the left curl is divided into two, more subtle. To get the first curl, in the divided left strand, you must thread the middle one and then join the halves. The same should be done with the right side. To make the spit look beautiful and bulk it is better to straighten the strands a little.

- Applying argan oil will help make your hair smooth and silky, and your skin will become really healthy and radiant.
- To properly treat dry lips, from the beginning you need to know why they dry, you can learn more here.
Necessary cosmetics
A hairstyle may look untidy if the hair will be very thick. To smooth unruly curls, you must use styling tools. Any mousse or gel will do. It is better to process damaged strands with cosmetic oil or liquid crystals. Also, to get the perfect hairstyle you will need a strong fixing varnish.
Having mastered the technique of weaving braids, you can always look stylish and impressive. This will certainly give you confidence in yourself and your own beauty.
Advantages of braids with ribbons
Now there are many different, unique, not similar to each other options, how to weave a ribbon into a braid. These are four and five strand braids, a French braid, heart-shaped braids, baskets, spikelets and many others. And the most important thing is that if you deal with everything step by step (with the technology for performing hair), then there will be nothing complicated.
The ribbon has many advantages:
- ribbon is a simple, affordable and inexpensive accessory,
- it complements, emphasizes and refreshes the image
- helps to give hair volume and make of a rare pigtail a chic braid
- perfect for all kinds of events
- Having studied the weaving, the laying will take only 5-10 minutes.

Simple and popular braid options
The easiest method of how to braid the braids with a ribbon is a three-strand braid. To make it, you need to fix the ribbon at the beginning of the tail so that the knot is not visible. Then it is necessary to divide the hair equally into two strands and put a ribbon between them. An ordinary braid is woven after, but instead of the third strand a ribbon is used. Alternatively, you can use a thin ribbon or colored yarn as an addition to the strands.
Long known is the French braid. It has a very big popularity. This weaving is a success due to the fact that it is one of the easiest and most effective ways to create a beautiful hairstyle. She also has many different variations, which allows each girl to choose her own. This braid is very simple, if you do everything step by step. To do this:
- 1. Carefully comb clean hair.
- 2. Fix the ribbon with invisible hair.
- 3. Remove the hair from the top just as the familiar French braid braids.
- 4. Pin a ribbon under your hair.
- 5. Split the hair into four equal parts.
- 6. The first strand is placed under the second. This needs to be repeated regularly with extreme strands.
- 7. Put the first strand over the ribbon.
- 8. The second strand is placed over the close right curl.
- 9. After these steps you need to twist the strand of ribbon from one side to another.
- 10. These steps need to be re-performed from both sides, constantly adding hair from each edge.